Synner — A TCP SYN Client Written in Rust
•This is an old post that has been migrated over one or more times. It may contain issues with certain images and formatting.
I am in no way trying to incentivize users to go and use such tools against targets without receiving full permission to do so. Nor do I guarantee that this won’t fry your network card. Users can use it at their own risk. The project can be found here.
Abstract
Denial-of-Service (DOS) attacks stem all the way from the early 1970s till today, causing excessive damage to organizations across the world. The following blog post goes through the thought and development of a specific DOS attack known as the TCP SYN flood, written in Rust and powered by libpnet. The tool itself is still a Work in Progress (WIP) however it’s enough to share my experience with low-level networking in Rust.
Introduction
The tool was named, “Synner”—because it sends SYN packets in rapid succession to a target in order to cause a Denial of Service, which is effectively a crime and a sinful act.. You be the judge.
Open-sourcing and writing about certain tools such as a TCP SYN flooder is often frowned upon in the infosec community. I don’t mind that. I believe we should be well aware of certain attacks, in order to effectively defend ourselves against them.
Why?
I currently work as a developer at a web security company and one of my tasks is related to the maintenance and development of what is effectively, a glorified open DNS resolver with some quirks and hacks.
After being bombarded a couple of times with traffic spikes exceeding 5000% of the normal packet intake on a particular interface, I decided to do some further digging. To cut the story short, I ended my research feeling smart and proud, going to management with a fat headline that screamed
We are under a TCP SYN flood attack (!)
Eyebrows were raised, concerns were voiced; until one of the management team members promptly asked, “but if this is through DNS, then we’re looking at UDP packets and not TCP (by default)” which was indeed true. Turns out, it had nothing to do with SYN floods, nor TCP for that matter. What was I thinking?
I was very wrong, and I threw a dangerous headline out there that could’ve sent us down a deep rabbit hole. So I swallowed my humble pill and decided that in order to truly make up for it, I must really understand what a TCP SYN flood attack is, by building a tool that does just that.
What is a TCP SYN flood
TCP SYN flood leverages the TCP three-way handshake (SYN -> SYN/ACK -> ACK) which is effectively three packets in the following order.
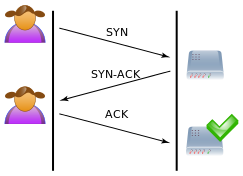 (Image courtesy of Wikipedia at https://en.wikipedia.org/wiki/SYN_flood)
The exception being that it is tuned to only send SYN packets (Synchronize). The idea here, is that such an operation is cheap for the transmitter (us) to transmit, however more expensive for the receiver (target) to receive and allocate resources to. More so, when sending the SYN packet, we don’t wait until we receive a SYN/ACK back (like a normal client would), we just continue transmitting more SYN packets for the server to handle. As a result, when a legitimate user tries to connect to the server, the server will be bottlenecked with a queue of SYN connections it already has to handle.
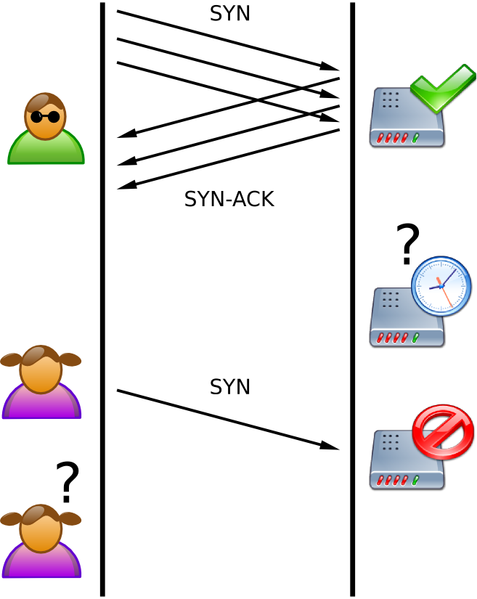 (Image courtesy of Wikipedia at https://en.wikipedia.org/wiki/SYN_flood)
Another troublesome concern for the receiver, is that the source (from now on src) can be spoofed, especially the src port. Making it rather difficult to pinpoint and block.
A random TCP SYN packet as a hex dump would look as follows.
0000   08 00 27 cb 9d 0b 48 4d 7e 9c 79 4b 08 00 45 00   ..'Ë..HM~.yK..E.
0010   00 34 7e b2 40 00 80 06 b8 b5 c0 a8 21 01 c0 a8   .4~²@...¸µÀ¨!.À¨
0020   21 0a f8 e0 b5 58 f4 fa f1 e9 00 00 00 00 80 02   !.øàµXôúñé......
0030   fa f0 66 5b 00 00 03 03 08 04 02 02 04 05 b4 01   úðf[..........´.
0040   01 00
Which when broken down may look something along the lines of.
0x08, 0x00, 0x27, 0xcb, 0x9d, 0x0b,	// Destination MAC
0x48, 0x4d, 0x7e, 0x9c, 0x79, 0x4b,	// Source MAC
0x08, 0x00,							// Type (IPv4)
0x45,								// IPv4 Header Length
0x00,								// Explicit Congestion Notification (congestion control)
0x00, 0x34,							// Total length
0x7e, 0xb2,							// Identification number
0x40, 0x00,							// Fragment Offset (Don't Fragment packet for us, it's under 1460 bytes)
0x80,								// Time to Live (128)
0x06, 								// IP protocol version (6/TCP)
0xb8, 0xb5,							// Header checksum using internet checksum technique (validation disabled)
0xc0, 0xa8, 0x21, 0x01,				// Source IP
0xc0, 0xa8, 0x21, 0x0a,				// Destination IP
0xf8, 0xe0,							// TCP Source Port (max 65535)
0xb5, 0x58,							// TCP Destination Port (max 65535)
0xf4, 0xfa, 0xf1, 0xe9,				// Sequence number, generally random to avoid other variants of TCP attacks
0x00, 0x00, 0x00, 0x00,				// TCP ACK value set to 0 since this is just a SYN packet
0x80, 0x02,							// TCP flags (only SYN [00000010] bit is set)
0xfa, 0xf0,							// TCP window size
0x66, 0x5b,							// TCP checksum
0x00, 0x00, 						// TCP urgent pointer set to 0, useful with stuff like FTP that use port 20 & 21 for control & transfer
0x03, 0x03, 0x08, 0x04,				// TCP Options
0x02, 0x02, 0x04, 0x05,	0xb4,		// TCP Options values
0x01, 0x01, 0x00					// TCP NOP option (padding)
That took longer than you think to write down and figure out.
Building the Tool
Being a newbie in Rust, and low-level networking in general, there was a lot to learn. This is where I truly saw WireShark shine. The ability to see any network traffic coming out of an interface, even if malformed, and analyzed, was priceless here. There were three key points I needed to achieve.
- Ability to select a specific Windows interface to bind a channel to
- Ability to send a packet through that channel
- Confirm that the packet was received by the target
Starting with number 1, libpnet has a wrapper function call in its pnet_datalink library called interfaces(). This was exactly what I needed. So I plonked a bit of code.
let interface = "\\DEVICE\\FOO";
let interfaces = interfaces;
let interfaces_name_match = ;
let interface = interfaces
.into_iter
.filter
.next
.unwrap;
..which unfortunately panicked, due to the initial buffer size being too small.
Turns out, unlike Unix’s simple and elegant eth0, eth1 and so on, Windows likes to be a tad more verbose with something like \Device\NPF_{927C716F-3AD0-42D6-89A1-0B121C6F5413}. So I submitted a short PR to libpnet and merged it to master to fix this.
Try again, and it worked (only after an hour to notice Command Prompt had to be running in Administrator mode ofcourse). I can now create an Ethernet channel and use it as a data transmitter, like so.
let interface = "\\DEVICE\\FOO";
let interfaces = interfaces;
let interfaces_name_match = ;
let interface = interfaces
.into_iter
.filter
.next
.unwrap;
let = match channel ;
Moving over to number 2, I had no clue how to build a TCP SYN packet and Google wasn’t really helpful. So I went to WireShark to extract a random SYN packet using the filter tcp.flags.syn==1 && tcp.flags.ack==0 and found one packet to mimic
Unfortunately these images have been lost in time. If demanded, I can attempt to recreate them.
Which I converted into a u8 vector and sent via the transmitter, like so (appending to earlier code).
let tmp: = ;
tx.send_to;
And away she went. No hiccups whatsoever, the packet was sent through the interface and could be seen in WireShark. I can remember this moment vividly and thought to myself, “I can actually make this happen”. This however was just the start. There were (and are) still a few hurdles to overcome.
Networking and Receiving Packets
There were a few things that I scratched my head with. First of all, if you take a look at the above hexdump that we originally showed, the Ethernet header must include the src and dst MAC addresses for the header to be complete. How on Earth was I going to pull the MAC address of a remote IP that I never spoke to?
Here comes Address Resolution Protocol (ARP). This protocol resides in the Link Layer of the OSI stack and allows us to map an IP address to a MAC address (or other way round, using RARP). Since we don’t know who the remote IP is, we broadcast an ARP packet to our default gateway (router) for some more information and the rest is… well I don’t know yet. I won’t be diving in this part too much as I don’t quite understand it to the degree that I’m comfortable with. If someone actually reads to this point and knows the answer, please do tell me. That said, assume we now magically know the remote interface’s MAC address.
Update — Reddit user /u/benjumanji helped explain this much better in /r/rust.
You only need the routers MAC address, not the MAC of the remote. That’s how routing works. I set my dst ip to head off to where it needs to and the MAC to that of the router (unless the IP is on the same network then I can send the packet directly, no router required). The packet is delivered to the router which figures the next hop MAC and overwrites and the dance continues and eventually your packet will hit a router that is on the same network as the actual target ip at which point the ever changing MAC will be overwritten to the actual destination MAC and your packet will be delivered.
The issues I was mostly experiencing at this point were primarily revolving around.
A. Me sending a packet over an interface that could not communicate with my target’s (VM) interface due to being on a different subnet entirely. B. Me not randomizing the tcp.seq field and the tcp.srcport field. This was causing WireShark to complain about some obscure errors, mostly around the fact that I am trying to send the same TCP packet over and over again, like so.
Unfortunately these images have been lost in time. If demanded, I can attempt to recreate them.
Which when changing the MutableTcpPacket.set_sequence(), MutableTcpPacket.set_source() and MutableTcpPacket.set_destination() from:
tcp_header.set_source;
tcp_header.set_destination;
tcp_header.set_sequence;
To:
tcp_header.set_source;
tcp_header.set_destination;
tcp_header.set_sequence;
Solved the issue of:
- Retransmitting the same packet (due to the sequence number being the same).
- Transmitting multiple SYN connections to the same dst port using the same src port which were allocated by a previous packet.
A. was just a matter of figuring out which interface to use to send the packet to. Which brought us to our last point, confirming that the packet arrived to our target destination in one piece (Don’t Fragment pun). To confirm this I used tcpdump with some filters to extract out SYN packets only:
vagrant@vagrant-ubuntu-trusty-64:~$ sudo tcpdump  "tcp[tcpflags] & (tcp-syn) != 0" -i eth1 -n
listening on eth1, link-type EN10MB (Ethernet), capture size 262144 bytes
11:35:30.828589 IP 192.168.33.1.34191 > 192.168.33.10.7626: Flags [S], seq 05323716, win 64240, options [wscale 8,sackOK,mss 1460,nop,nop,eol]
11:35:30.828621 IP 192.168.33.1.62172 > 192.168.33.10.529: Flags [S], seq 299760578, win 64240, options [wscale 8,sackOK,mss 1460,nop,nop,eol]
Looking good, we can see some of the packet being reflected in there, such as the TCP Options, nop, nop, eol mapping to 0x1, 0x1, 00 at the end of the packet. Additionally the TCP source ports are randomized as can be seen between 34191 and 62172.
How fast is it?
Pretty slow. My implementation in fact is super slow for multiple reasons.
- Not using any compiler optimizations;
- Using
pnet_datalink::DataLinkSender::send_to insteadofpnet_datalink::DataLinkSender::build_and_sendwhich means that internally I’m performing a clone on each packet which is far from ideal.
Thus, with the current poor implementation, we are looking at 1,000,000 TCP SYN packets being sent in 29.48 seconds, or rather 33,921 packets per second. Not exactly breathtaking.
Update: After a few tweaks, I have ran a few benchmarks comparing Cargo –release flag and debug build which achieved an astonishing result
PS synner\target\release> Measure-Command {./synner 192.168.33.10 "\Device\NPF_{927C716F-3AD0-42D6-89A1-0B121C6F5413}"}


Days             : 0
Hours             : 0

Minutes           : 0
Seconds           : 6
Milliseconds      : 736

Ticks             : 67369563
TotalDays         : 7.797403125E-05
TotalHours        : 0.00187137675
TotalMinutes      : 0.112282605
TotalSeconds      : 6.7369563
TotalMilliseconds : 6736.9563


PS synner\target\release> pushd ../debug
PS synner\target\debug> Measure-Command {./synner 192.168.33.10 "\Device\NPF_{927C716F-3AD0-42D6-89A1-0B121C6F5413}"}


Days              : 0
Hours             : 0
Minutes           : 0
Seconds           : 19
Milliseconds      : 688
Ticks             : 196886353
TotalDays         : 0.00022787772337963
TotalHours        : 0.00546906536111111
TotalMinutes      : 0.328143921666667
TotalSeconds      : 19.6886353
TotalMilliseconds : 19688.6353
Rust and Cargo
Lastly which brings me to the last part of my post, regarding Rust. Ofcourse it may come off as hipster or act as a clickbait title but there are multiple reasons I chose Rust.
- Coming from a Python & Java heavy background, I want to learn and love memory management. The sense of control over your machine’s memory is wonderful.
- With memory, I still wanted safety; you know the rest.
- With that safety, I still wanted speed; you also know the rest.
Lastly the snippet to build the packet looks like something along the lines off.
Keep an eye out for the header offsets, they are key to building the packet correctly. Also notice how certain stuff (like IPs) are hardcoded in there.
If you want to get this to work, you need to configure the Ethernet dst and src to point to your interface’s MAC address and the target interface MAC address. You also need to configure the hardcoded source IP from 192.168.33.1 to your own IP. Make sure the target IP is on the same subnet. I explained it in more detail in the following issue.
Conclusion
Overall, this took me a few weeks of picking it up and putting down, multiple times. I’m nowhere near proficient in low level networking nor Rust however it’s something I enjoyed documenting considering I was going to drop this project altogether.
From here I’ll continue tinkering with the tool which you can follow here in order to:
- Set the source IP correctly and hopefully automatically from the interface
- Perform the ARP lookup to retrieve the remote MAC address prior to sending TCP packet
- An all round better command line interface